Download the Mobile App
For any additional support requests, these should be filtered through Jira Service Management. To learn how to submit a new ticket or review existing requests, please follow this guide. If you do not have access to JSM, please contact your account manager.
Instructions for End-Users /Suppliers
Making new bookings
- Click +Booking on the green toolbar
- Enter in your booking information on the first page: User type; Date; Delivery Area; Vehicle Type
- Click Get Times and select your booking slot
- Click Next
- Enter in the information on the second page: Site contact details; Delivering Company details; Driver information; Vehicle information; additional fields
- Click Submit
Viewing / Editing deliveries you’re associated with
- List or Calendar: you will see any bookings you’re permitted to see
- Search: Search by booking reference, VRN, names etc
- You will have the same permissions on the app as you do on the website.
- If you can’t see / edit the delivery you’re supposed to see / edit on the phone or the website:
- Contact support@voyagecontrol.com with the email you’re logged in with, the kind of phone you’re using (Apple or Android), the version of the app you’re using (to find this click … on the toolbar and click about), and the booking reference of the booking.
- You may need to be re-associated with the company you’re delivering for to see the bookings.
Tracking deliveries
- To track deliveries successfully, tracking needs to be set to Always On in your device settings. This is due to the fact that if you minimise or close the app with any other setting, the tracking will stop. This does not mean that Voyage Control are always tracking, but that when Start Journey is clicked via the app, our servers are always able to reach your device.
- Click on List or Calendar to see the bookings you’re supposed to be able to view or click Search and search the booking reference
- Select the booking you’re supposed to track
- Click Start Journey
- When you finish tracking, click End Journey. You must do this on the same day you click Start Journey.
- If you do not see the Start Journey or End Journey button, please contact support@voyagecontrol.com with the email you’re using to log in and view the bookings, as well as the booking reference.
- You will have the same permissions on the app as you do on the website. If you can’t see the delivery you’re supposed to track on the phone or the website, please contact support@voyagecontrol.com with the email you’re logged in with and the booking reference of the booking.
Site Admins
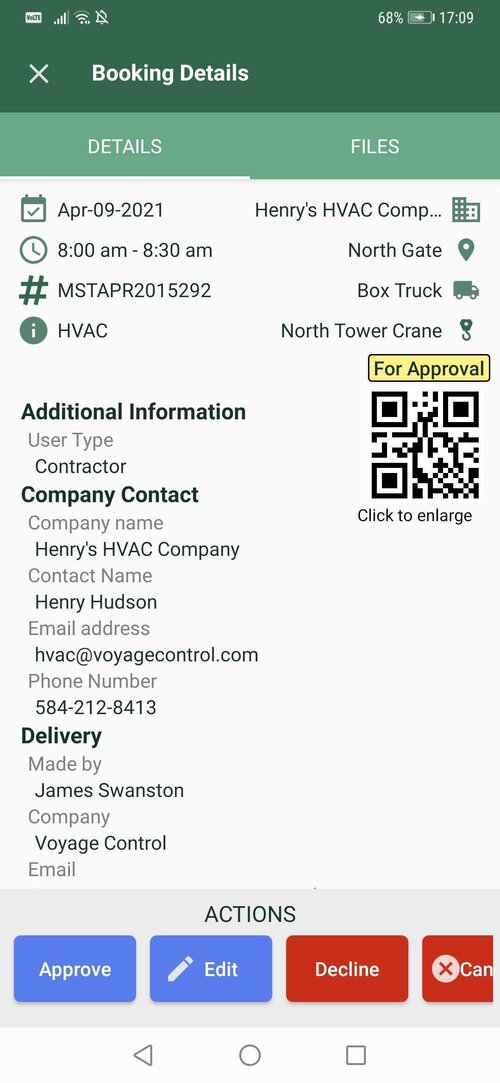
Approving, declining, checking in, checking out, refusing, reporting
-
If you have permissions to check bookings in and out, you will see this option when you click on a booking from the list or calendar views
-
Click on a booking - you will see Booking Details come up
-
At the bottom of the screen there will be an Actions toolbar. This will contain various buttons depending on your permissions on the web platform
-
Click approve; check in; check out to edit the status of the booking. Or, if you do not see the buttons, click the … on the bottom right
-
You will have the same permissions on the app as you do on the website. If you can’t see the buttons you expect to see on the app or the web, please contact the team member on site responsible for assigning permissions to grant you additional permissions. Please do not contact support@voyagecontrol.com as we will not be able to grant additional permissions without the sign off from our contacts on site.
Filtering your list or calendar view
-
Click List or Calendar on toolbar along the bottom
-
Click the filter button on the top-right corner
-
Select up to three options to filter on
-
You can filter on date; area; month; status
-
-
Click Apply
Step-by-step photo guide:
Android App
Sign up / Login:
If you have not yet created an account at any of the Voyage Control projects, please click on ‘Sign Up’ when presented with the login screen. If you have an account, you can sign in with your existing credentials. If you forget your password, please click ‘Forgot Password?’ and an email will be sent to the email that you have registered an account with.

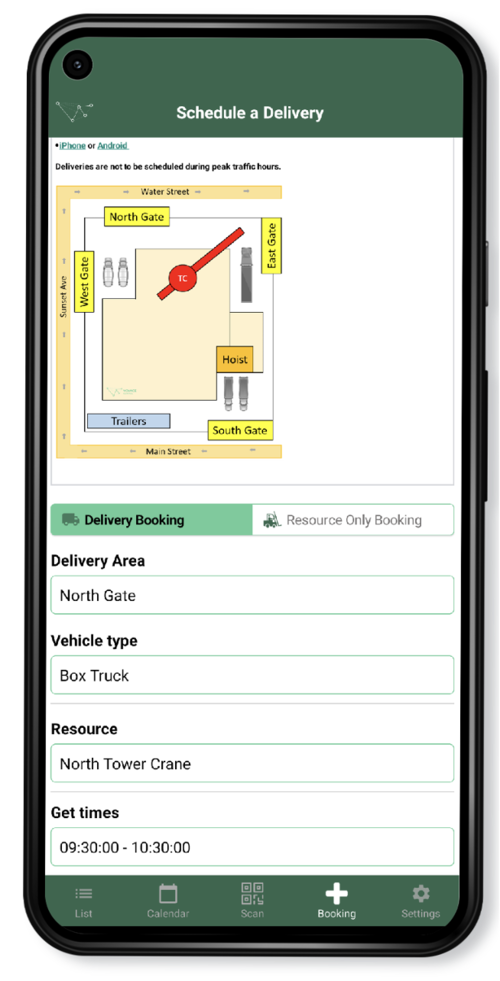
First page of the booking process
Make a Booking:
- There are two pages in the ‘Make a Booking’ process that will need to be completed
- The first page will require that you enter:
- Delivery Area
- Vehicle Type
- Resources (if any)
- Request a booking slot
On the second page you will need to enter a series of other fields which may include:
- Subcontractor details
- Your details
- Material
- VRN
- Driver
- Floor of the building
Once you have entered all of the required information, you will be required to hit ‘Submit’, which will take you to a confirmation page, confirming that your booking has been processed. An email will also be sent to the account holder with your booking details.
.png)
Second page of the booking process
Viewing your booking(s):
You can view your bookings (any others if you have permission to) from within the ‘List’ and ‘Calendar’ views.
Here you also have the options to sort and filter bookings based on a range of factors.
As you will see there are various different colour codes in both views, these help to show you which statuses the bookings are at: For approval, scheduled, checked in, checked out, declined etc.
If you need to edit any of the details of your booking, simply click into the booking from either of the ‘List’ or ‘Calendar’ views and proceed to edit the booking from the actions across the bottom panel (see below). Here you can view, edit or cancel your booking as well as access the QR code which may be required to be checked in on-site.
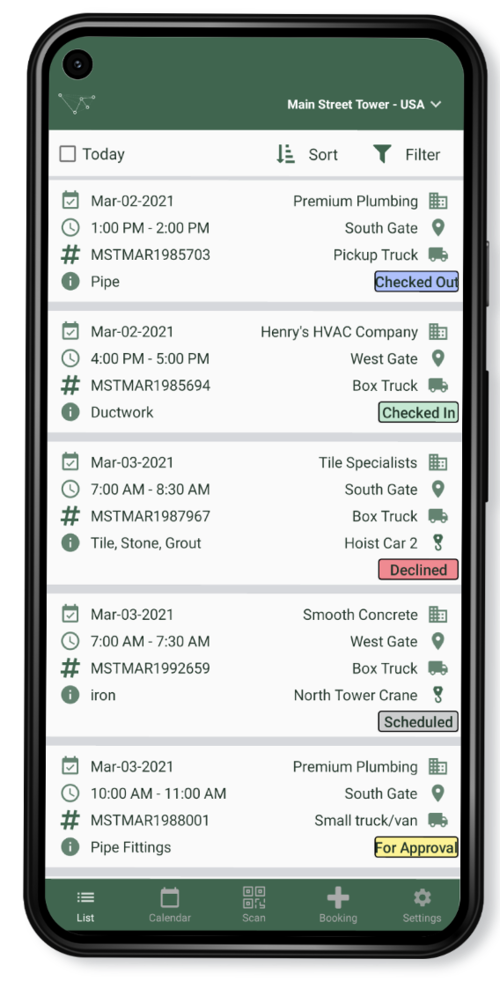
List of Bookings
View, Edit, or Cancel your booking
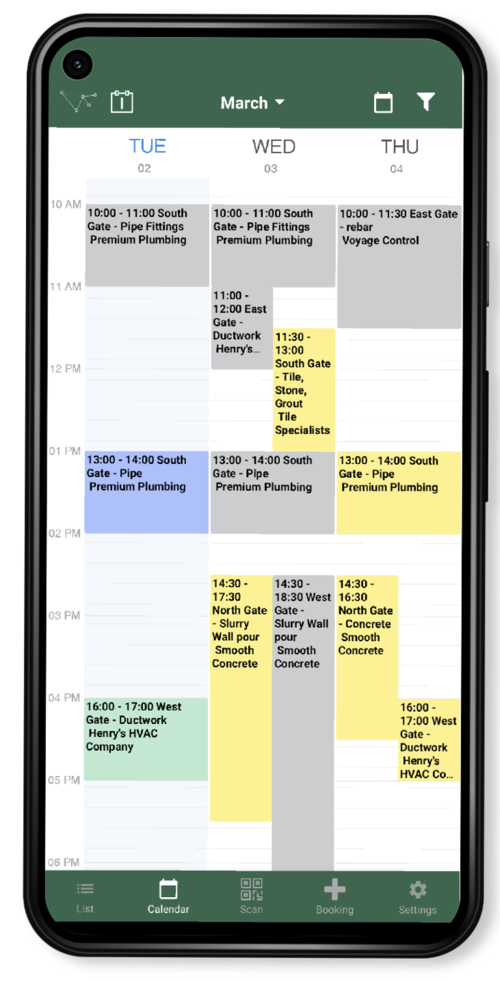
Calendar View
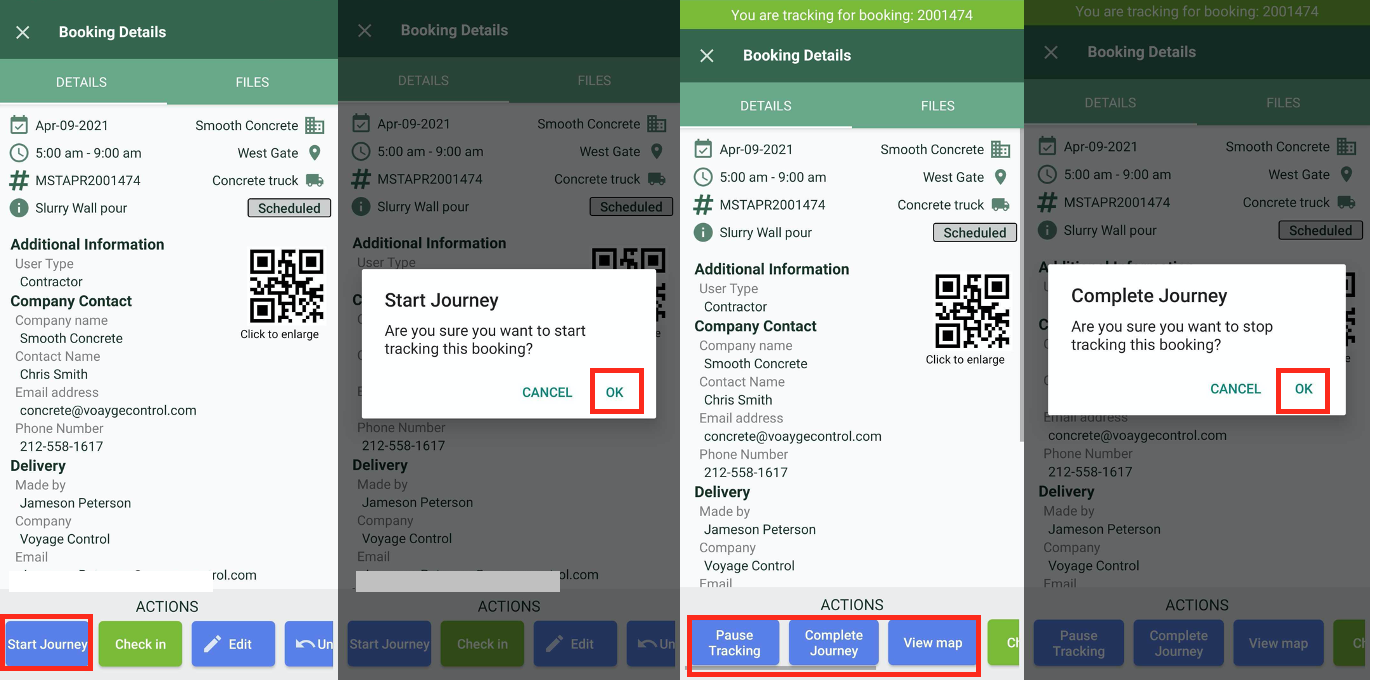
Vehicle Tracking:
To track your journey, you will need to enable vehicle tracking. A pop up may appear on your device asking if you would like to enable location tracking ‘Always’ or ‘Only whilst using the app’, click ‘Always’. This will not continue to track anything other than the vehicle booking, but it will mean that we gain accurate tracking data if you navigate away from the Voyage Control app, or switch to a different screen.
To track your vehicle from the app:
- Click into the booking that you would like to track from either the List or Calendar view. This will open up the ‘booking info’ view.
- From here click ‘Start Journey’
- A popup will appear, as in the second screenshot below, click ‘OK’
- A banner will appear at the top of the booking to show that tracking has started, and the options across the bottom panel will update - giving you the option to pause tracking, complete tracking and view the map of your journey
- Once you have arrived at your destination, click ‘Complete Tracking’
- A popup will appear, as in the final screenshot, click ‘OK’